
A dental implant procedure completely replaces both the crown of the tooth and its root, making it an extremely effective means of permanently restoring function to the oral cavity. Because dental implants look and function like teeth, patients often forget they have them. They look and feel like healthy, natural teeth but are in fact sturdier and less prone to damage.
Dental implants are a good choice for patients who require a total tooth replacement and:
- Are in otherwise good oral health
- Do not have problems with bone healing
- Have enough underlying bone to accommodate the root
- Are old enough to have grown a fully developed jawbone
Your dentist can tell you if dental implants are right for you.
What does a dental implant procedure look like?
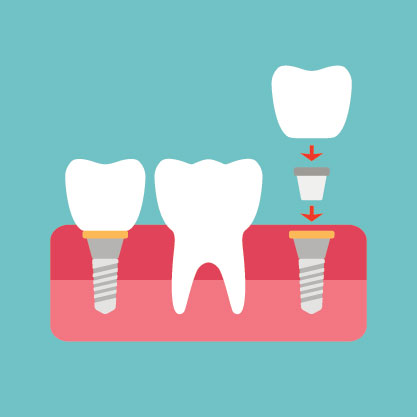 Dental implants mostly composed of three parts:
- Implant – A screw that is placed in the jawbone
- Abutment – Connector between the screw in the bone and the area above the gums
- Crown – Placed over the abutment
Dental implants are permanent, advanced replacements for missing teeth, so before beginning treatment, there will be a consultation with the dentist. Some patients may also need to consult with their oral surgeon or periodontist. The dentist will assess the patient’s dental health and whether sufficient bone exists to accommodate the implant. This assessment will normally include X-rays or CT scans to get a full picture of the patient’s jaw and supporting structures. In some cases, the patient may need to undergo additional bone grafts to provide enough of a foundation for the implant. With the preliminaries complete, the dentist will advise how long the process will take and what steps to expect along the way for the individual case.
Generally, the first step includes removing the tooth. Often the implant can be placed immediately. However, occasionally a bone graft needs to be done first, with delayed implant placement. If the patient smokes, he/she may want to quit as smoking slows down osseointegration—the process of the implant fusing to the bone.
Once the patient is cleared for the procedure, it can begin immediately. Dental implants are placed in stages over time to allow for complete healing in between. Here’s what the process looks like:
1. First, the implant is placed – The first stage involves preparing the jaw for the implant and installing the implant itself. In some cases, a temporary abutment may also be placed, but this is up to the dentist and will be discussed beforehand.
Implant placement is done by drilling pilot holes into the jaw where the implant is expected to go. There are numerous important structures near the jawbone, so the dentist can use individualized surgical guides built from the patient’s CT scans. This ensures pinpoint accuracy when guiding the drill.
Once the pilot holes are in place, the dentist will slowly widen them to accommodate the titanium implant. Titanium is primarily used in replacement of body parts (such as hips, knees, etc.) because it’s the least rejected metal by the human body.
When the pilot holes have been enlarged enough, the implant is placed in the jaw. It will take several months for the surgical site to fully heal and for the implant to completely anchor in the jawbone, but the implant will not cause issues with eating or aesthetics in the meantime. In fact, it will be nearly impossible for anyone to see it, even when the patient’s mouth is open.
2. The healing cap is placed – The surgeon or periodontist who placed the implant will check the correct integration of the titanium implant in the bone and place the healing cap.
3. Impressions are taken – The patient will then be advised to see a restorative dentist to take impressions in preparation to fabricate the coronal portion of the implant restoration. The healing cap will be removed, special transfer parts will be placed and the position is verified with X-ray. A dental tray with impression material will be placed in the mouth. Bite registration will also be obtained. The shade of the new implant crown will be decided on. This impression will then be sent to the lab to fabricate the final abutment and crown.
4. The abutment is placed next – The abutment connects the crown to the implant portion in the bone. This is a quick process that requires only a minor procedure, so healing is usually quick.
Often the crown and abutment will be already cemented in the lab. Occasionally the crown needs to be cemented on the abutment during the delivery appointment.
5. Permanent crown is placed – Sometimes, in aesthetic areas where a temporary crown was used, the temporary will be replaced with a permanent crown. The temporary crown helps to form the shape of the gums so that once the permanent crown is in place, it will look natural and form a healthy boundary between tooth and gum. The dentist will monitor gum growth around the temporary crown and when convinced that the area is ready, the temporary is switched out for the final crown.
6. Recovery – The implant procedure is complete once the final crown is put in place. It will take a month or two to completely heal from the procedure, but most patients feel little to no discomfort during this time. As with natural teeth, good oral hygiene habits will prolong the life of the implant, protecting it from neighboring decay or gum disease. The dentist will follow up with the patient to check the recovery process. The use of an occlusal guard and a Waterpik is required.
If the patient takes good care of the implant, it can last decades. It’s not uncommon for an implant to remain viable for up to 40 years, so it truly can be a permanent solution, offering superior function and form. Ask your dentist for treatment options and details.